

This Blog is dedicated to providing information related to the snowmobile industry and how it supports skiing and snowboarding with the Mo Pros Snowmobile Ski and Snowboard Rack Products.
Floating The Boat
Floating the boat. With the next wave of storms inbound weather windows will be short lived. On the other hand temperature set ups seemingly leaning towards blower pow.
Long range models are also suggesting continued storms through late April; winter is kind of on a rally phase and gaining that typical La Niña momentum :)
Be Inspired and Ring the Alarm
The tour begins with Tanner Hall and John Spriggs, celebrating the success of the new film Ring the Alarm. Ring the Alarm is one of the few films which is coming out for FREE, meaning you can watch it as many times as you please, no downloading or purchasing required. Truly a free shout out to the fans.....which is hella sick.
We appreciate Tanner's commitment and energy in his latest 2 year project and were also fortunate to be a part of it.....supporting a video for everyone to enjoy and watch for free. The guys certainly did a ton of snowmobile access skiing and even snowboarding with the crew involved....something you obviously know we're down to have happen
Check out some of the content on www.newschoolers.com like the link below; the boys are touring this thing off and throwing one hell of a party.
http://www.newschoolers.com/news/read/BE-Inspired-Premiere-Quebec-City

Snowmobile Rack Carrying Features
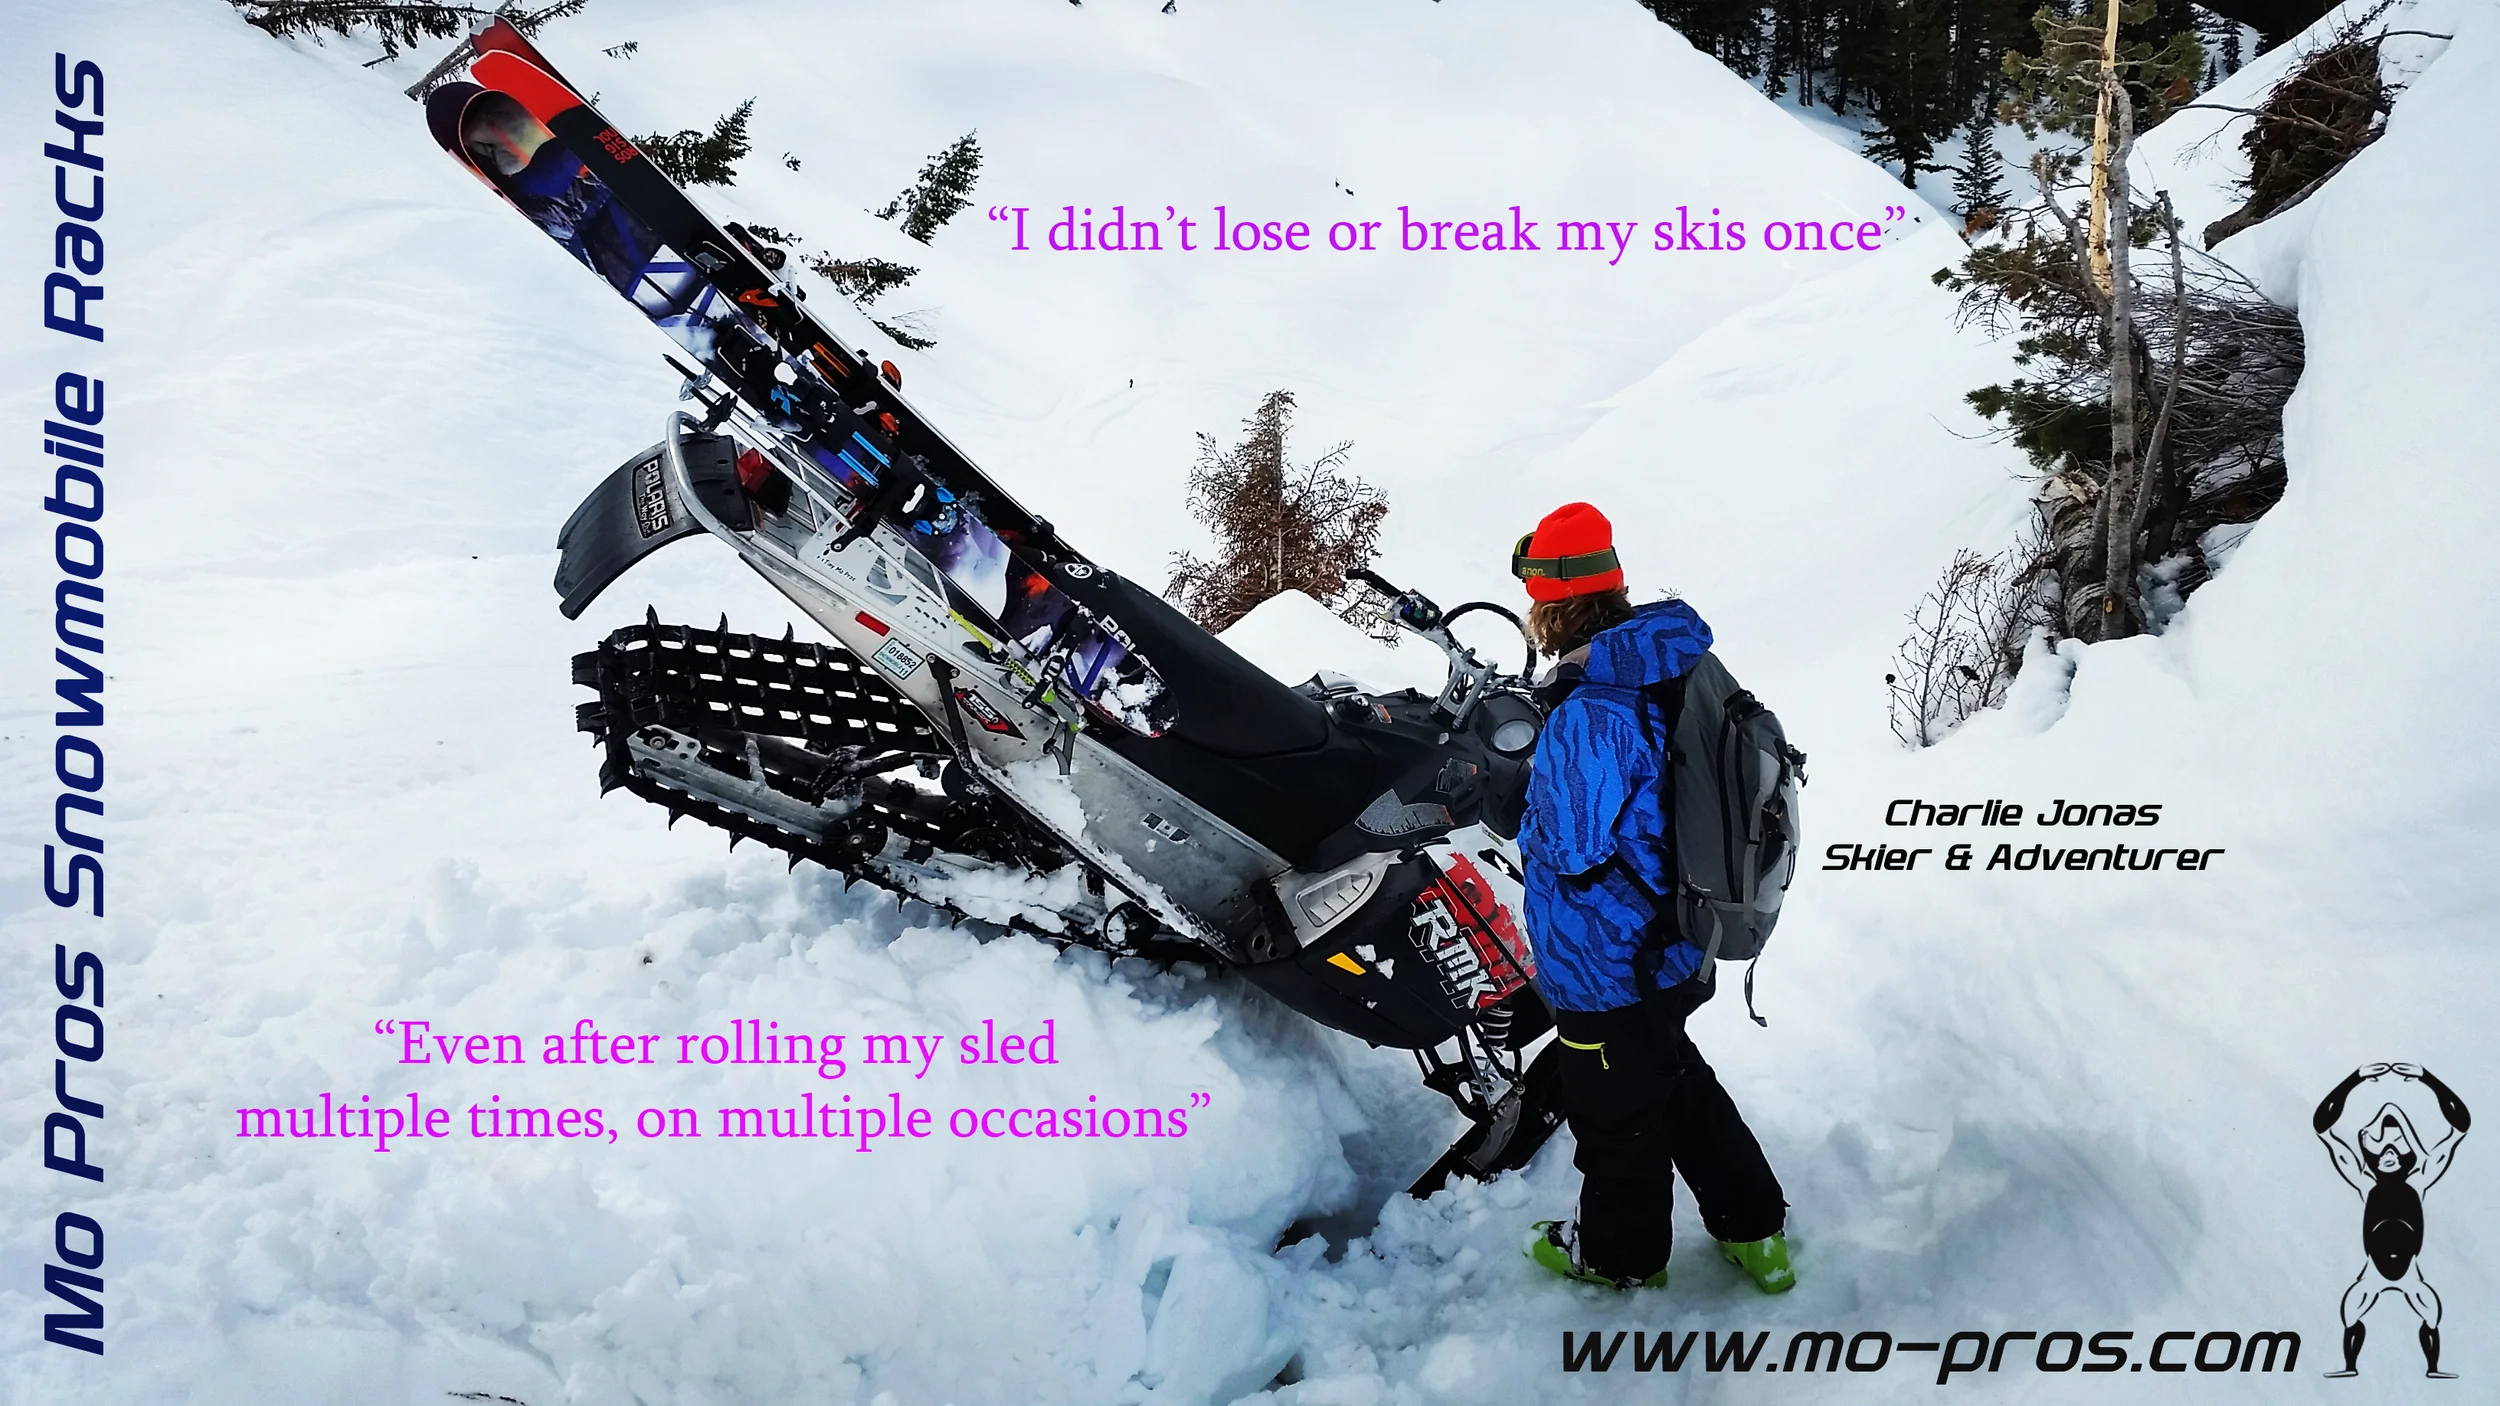
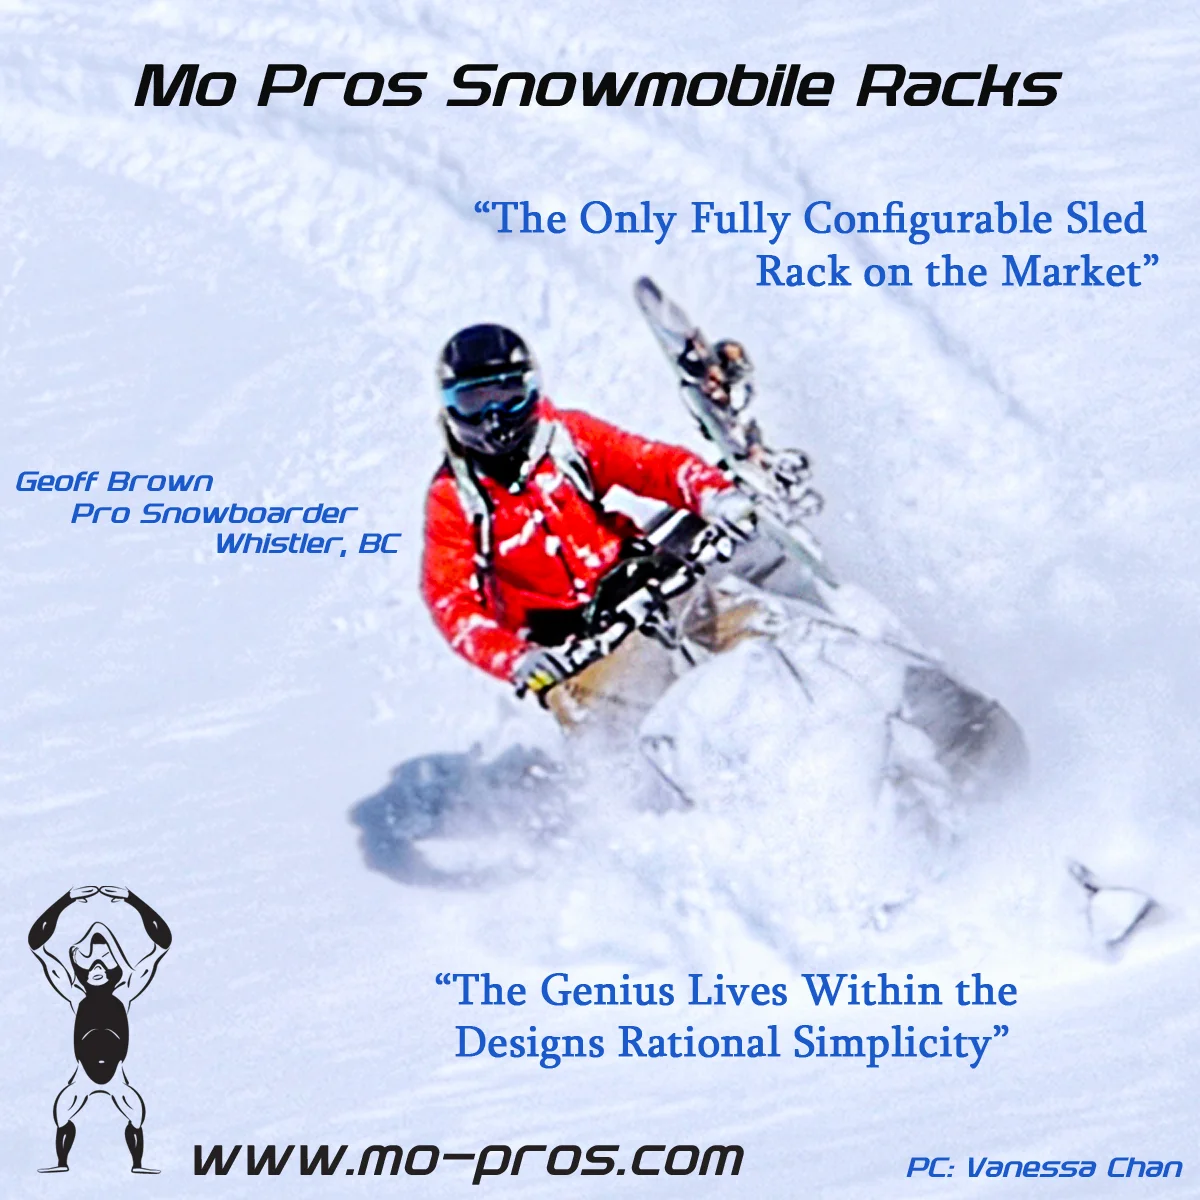
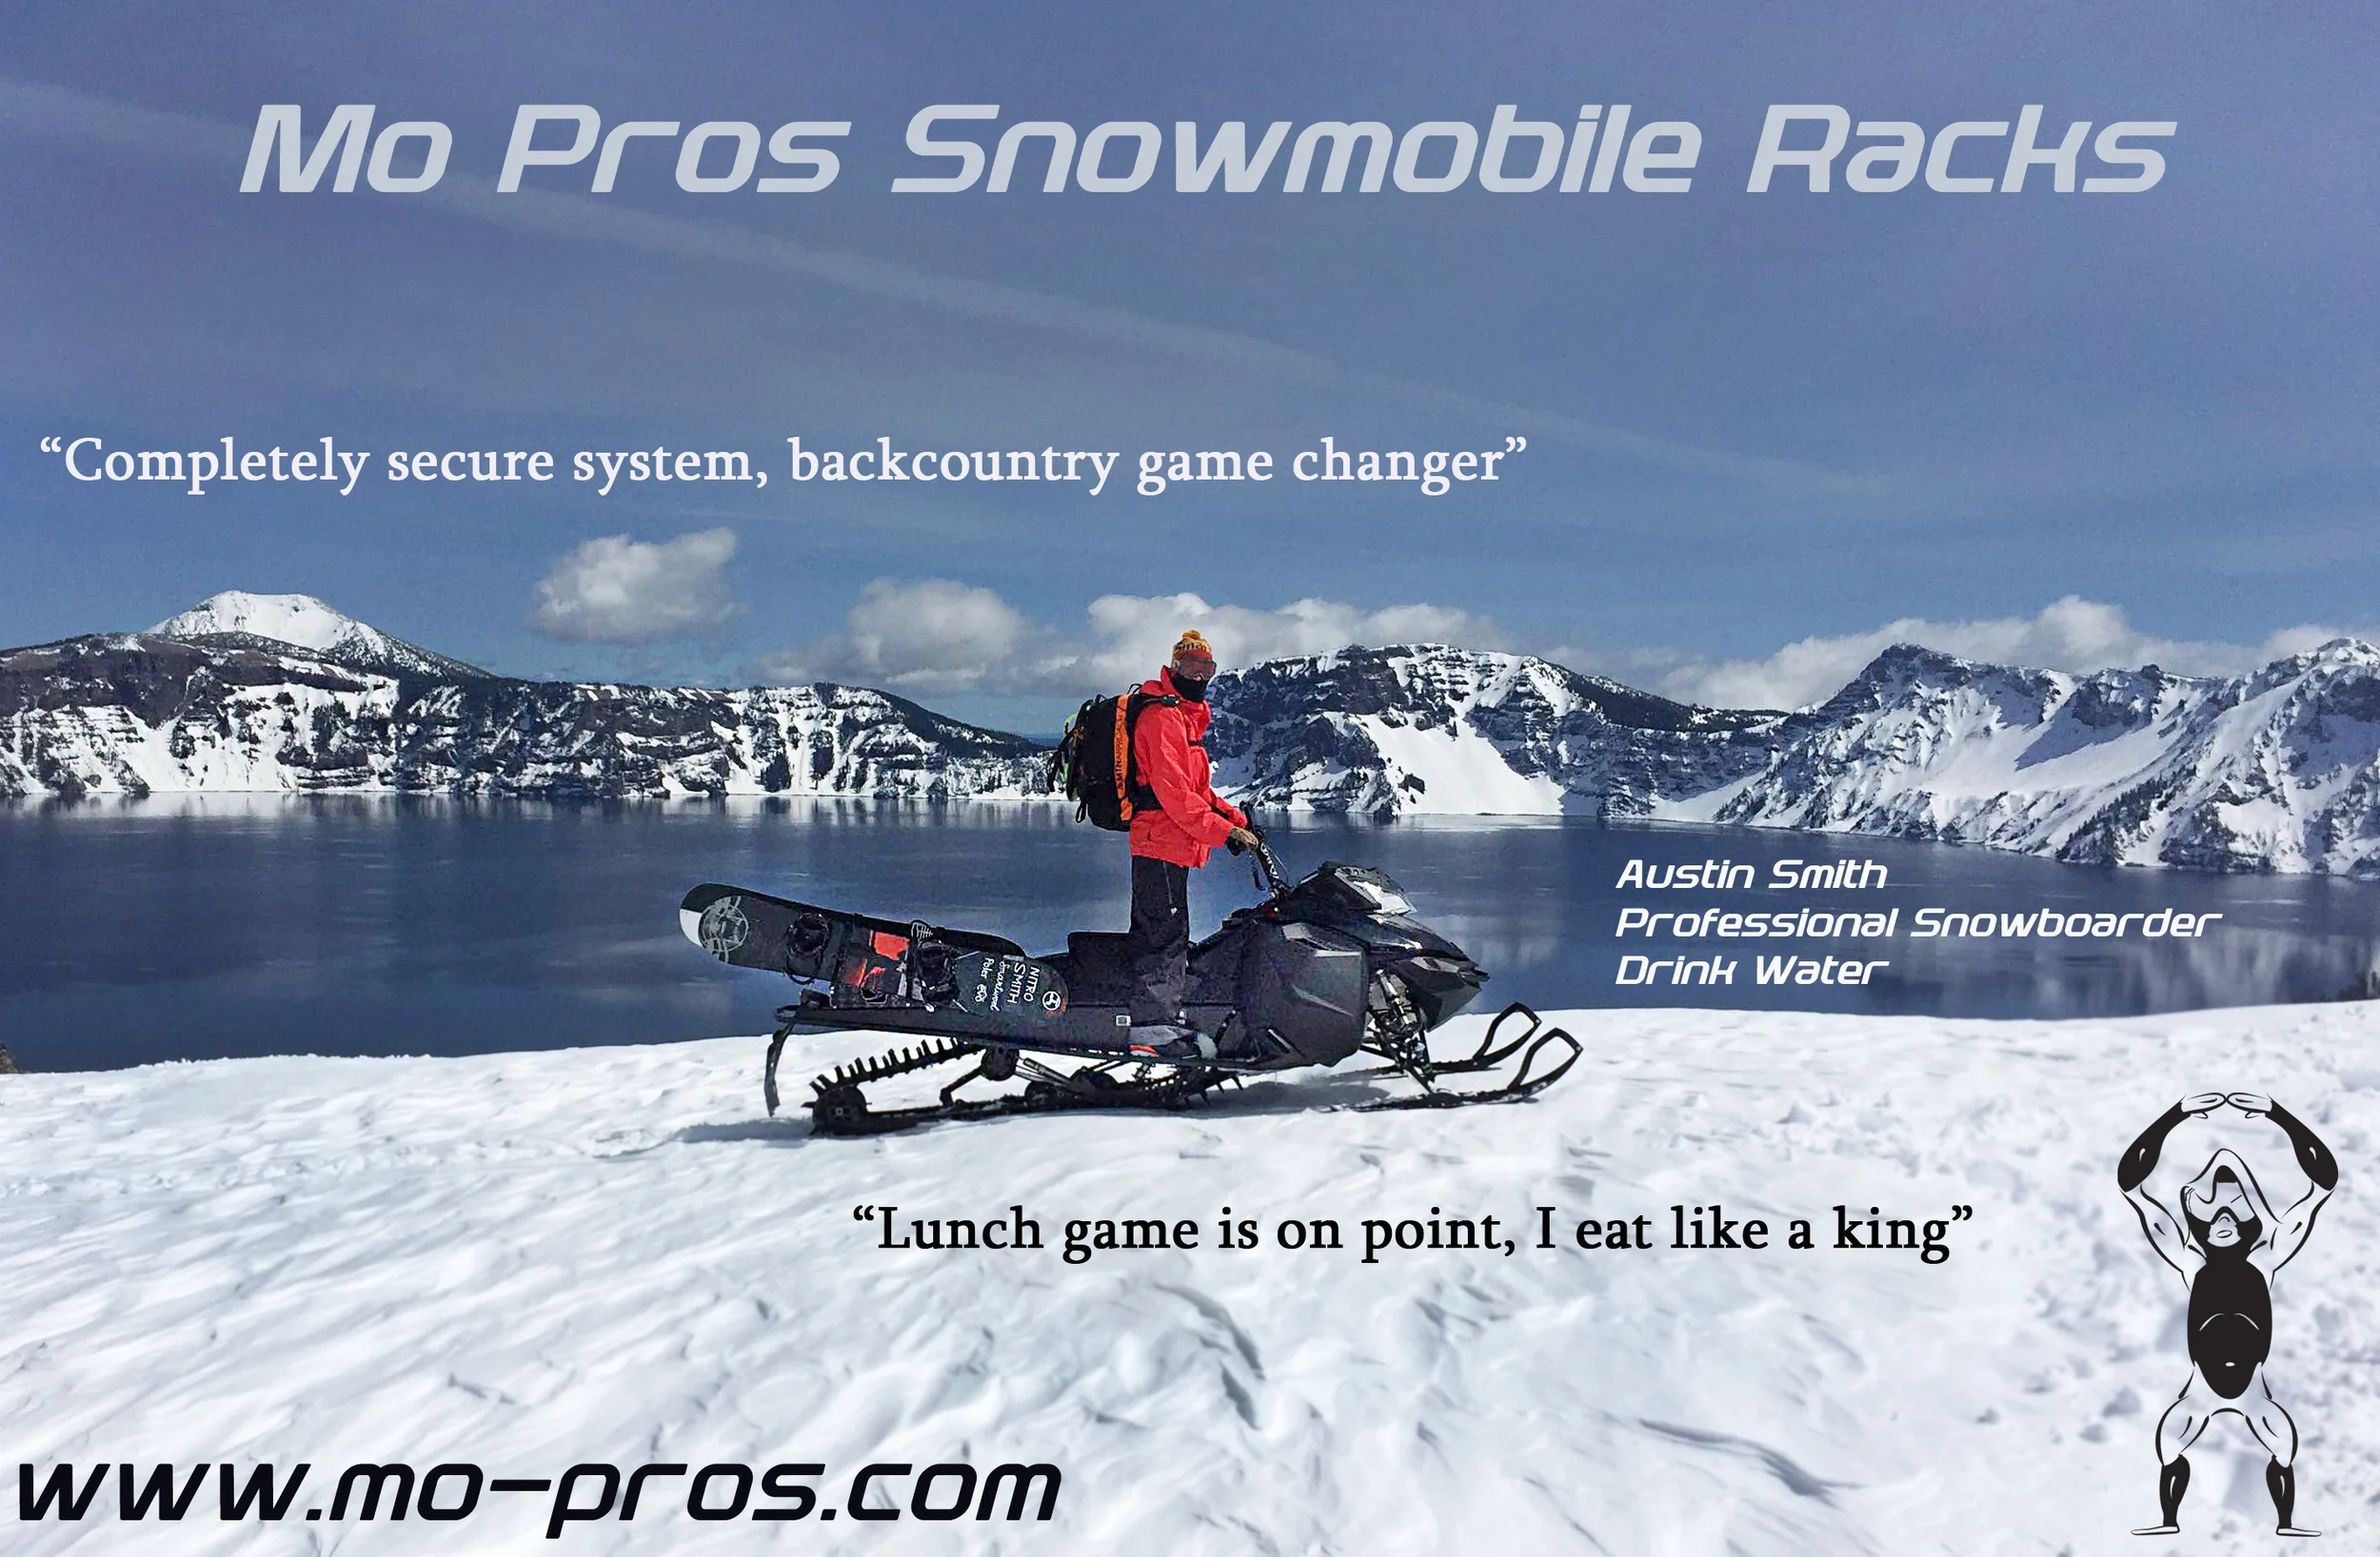
The Ajoosta Rack by Mo Pros is a utility snowmobile rack, which you can modify and set up for your explicit needs. Backcountry travel is variable and the mission constantly changes......shouldn't your rack system too?
The Mo Pros Snowmobile Rack also accommodates carrying external devices, through accessory attachment options. Although the Ajoosta Rack has been well known in the industry for it's performance capabilities as a snowmobile ski rack and snowmobile snowboard rack, however the capacity reaches much farther for carrying options.
Snowmobile Rack External Bracket Carrying Capabilities:
Fishing Rod Cases
Skis
Snowboards
Pow Surf Boards
Marking Stakes
Camera Tripods
Snow Shovels
Tent Bags
Lawn Chairs
Gun Cases
Now that you've got the carrying capabilities and customization to keep the cargo locked down on your snowmobile or Timbersled snowbike, it's important to distinguish what capabilities you still have. Sometimes when utilizing other products, product technologies may cross over other usable features, it's critical to think of these items when making Snowmobile Rack, Snowmobile Ski Rack, and or Snowmobile Snowboard Rack purchasing decisions.....check out the infographic below for details:
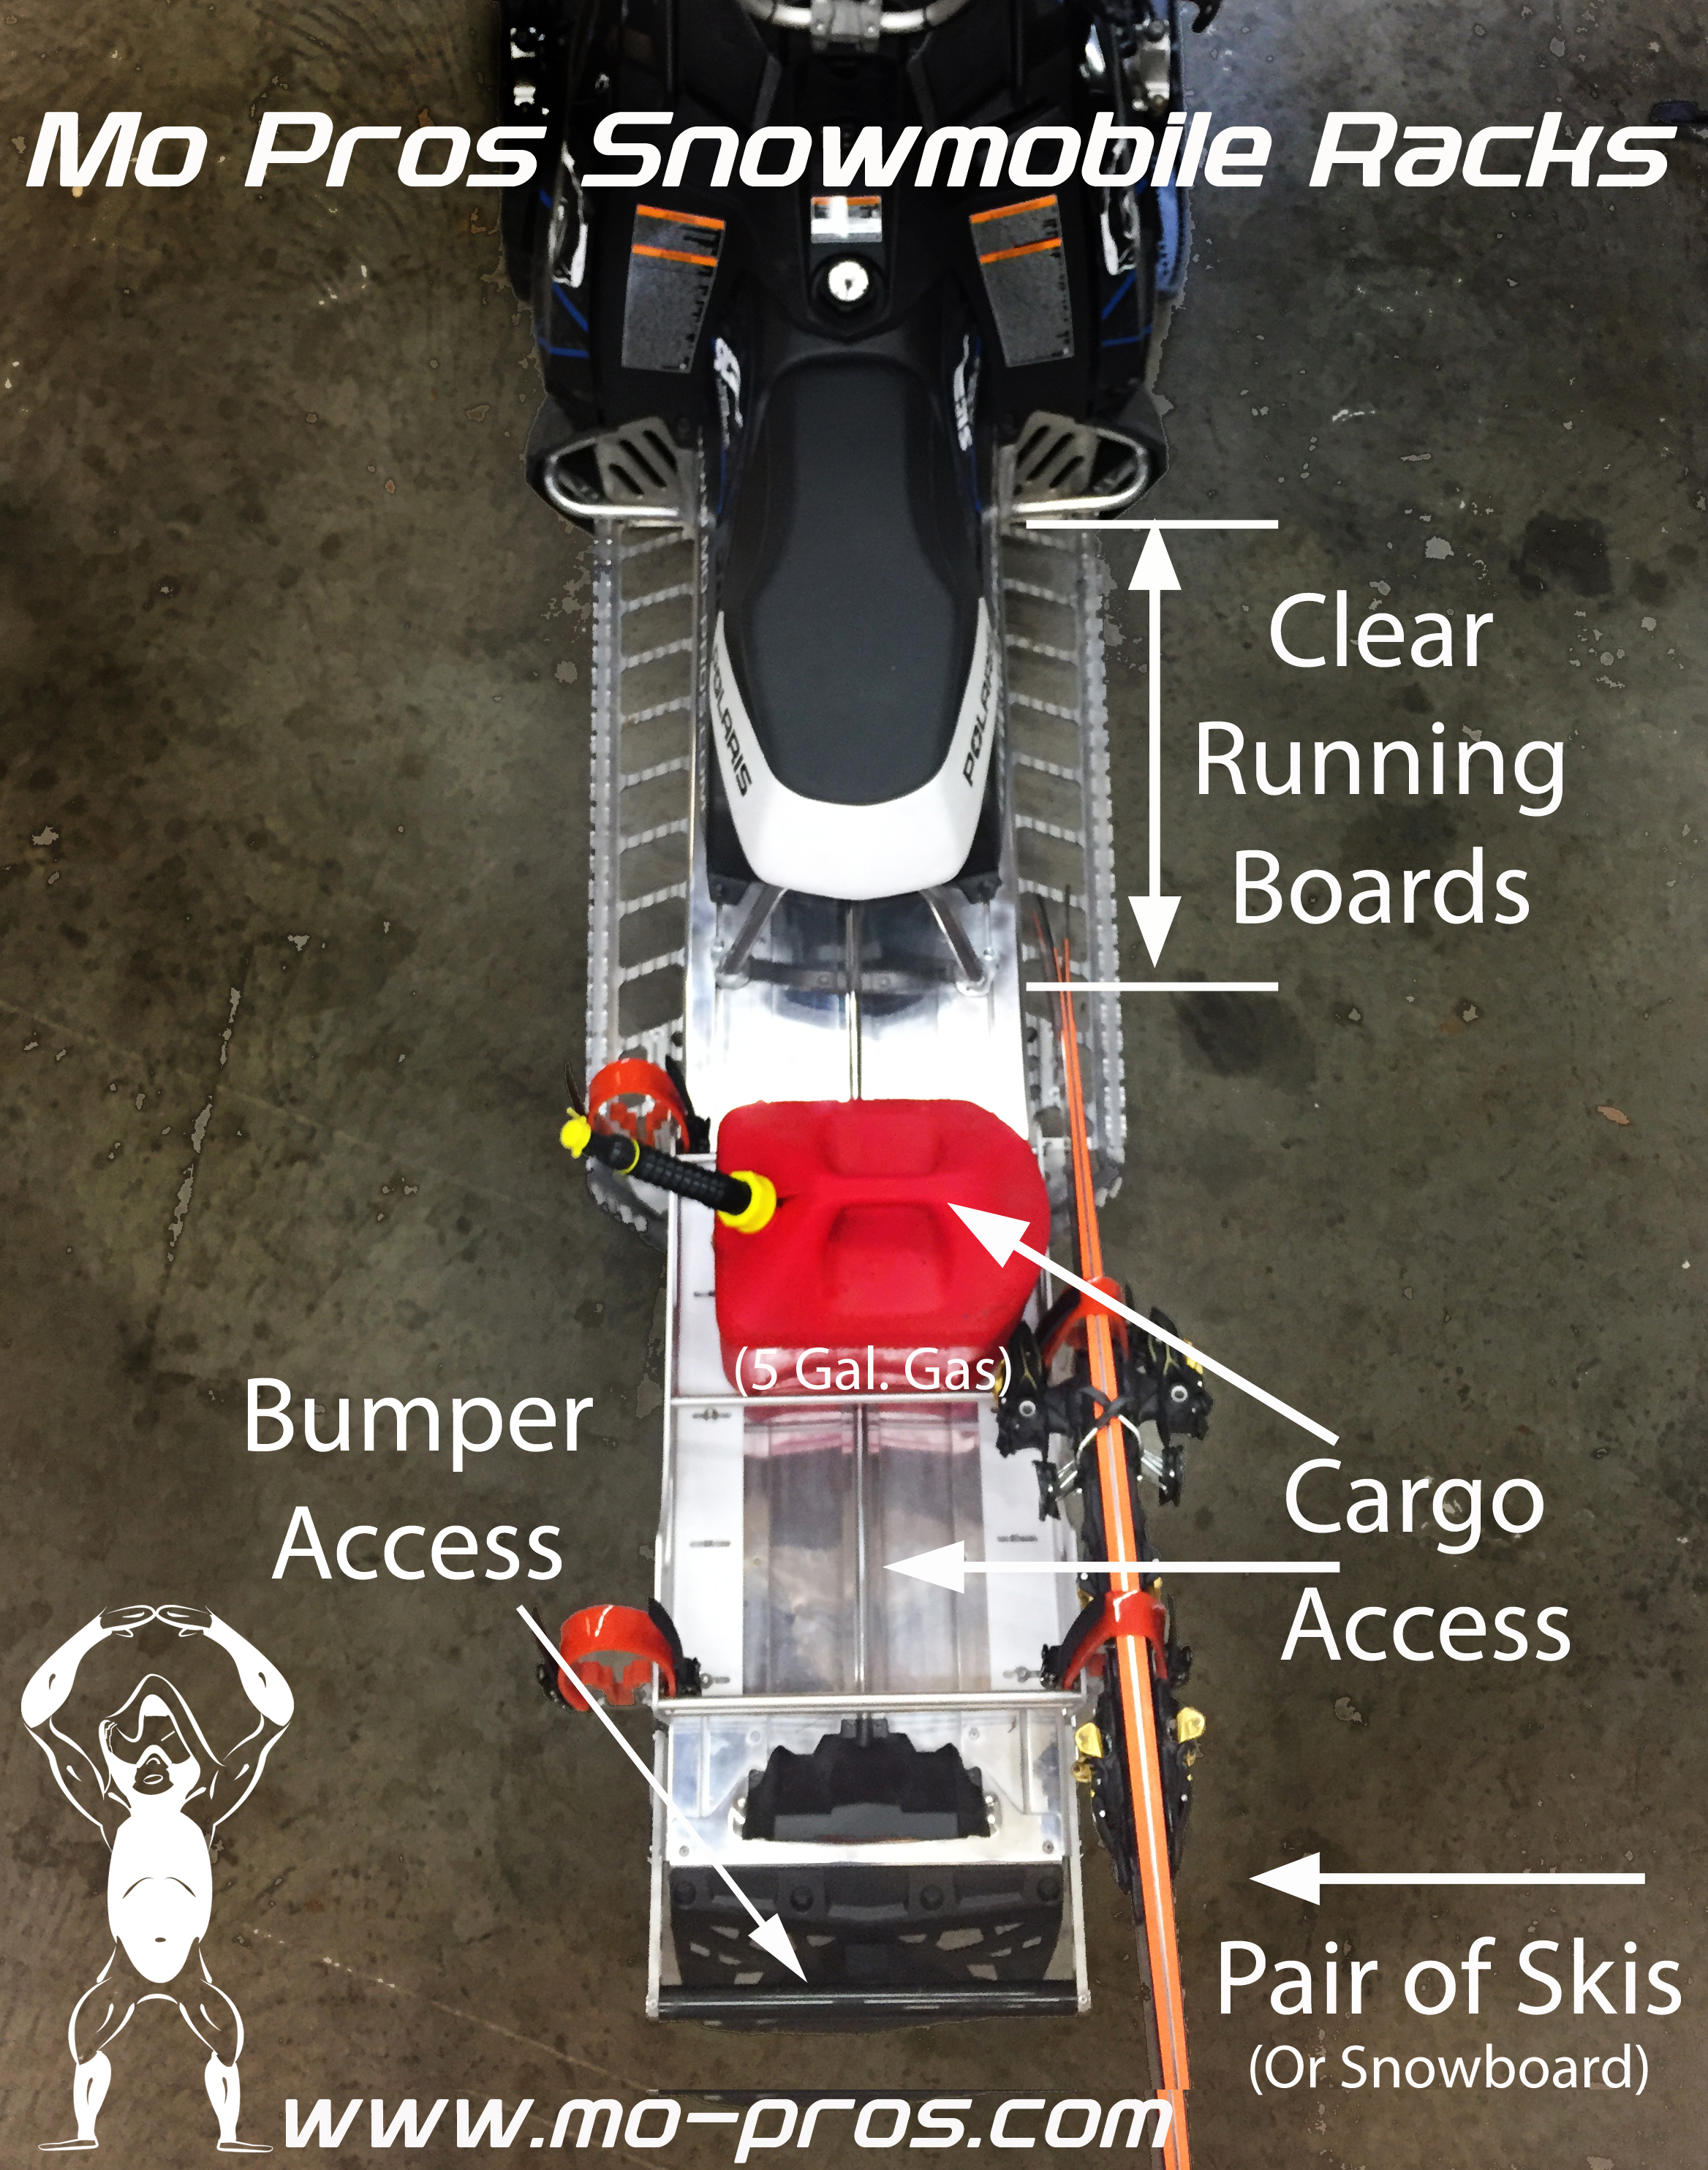
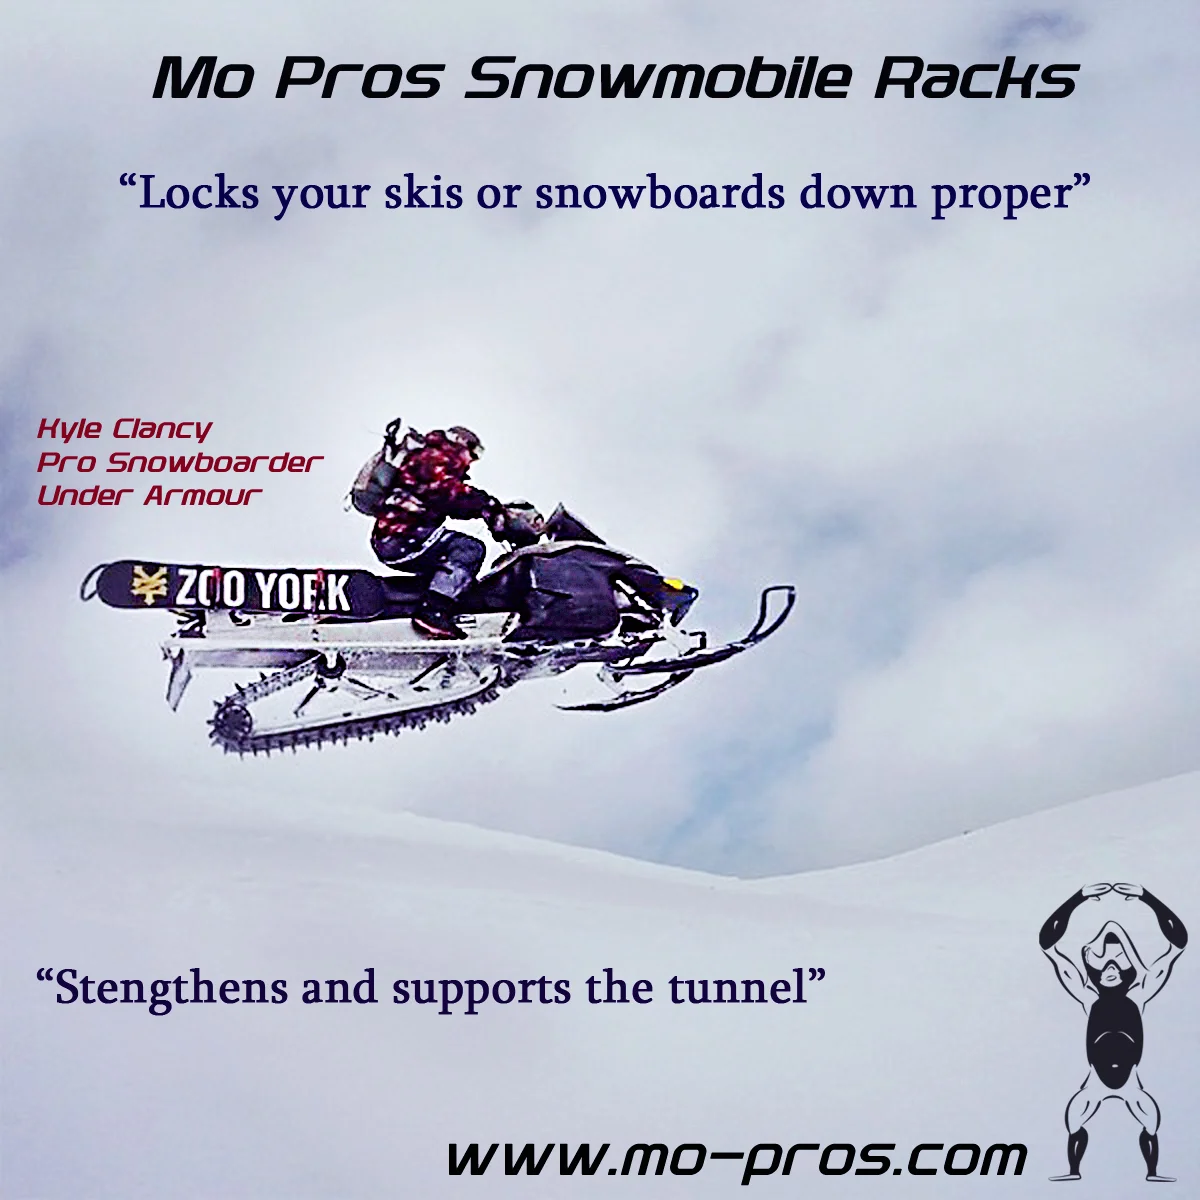
Mo Pros Snowmobile Rack Superior Design:
Leave Cargo On, Get Out of Holes Faster
Roll Machine with Cargo/Gear Secured
Clear Running Boards For Sledding
Weight Distribution Options - Better Flotation
Never Blocks Gear Bags/Cargo Access
Never Blocks Rear Bumper Access
Fastest Loading/Unloading Industry Wide
Access to System from Any Angle


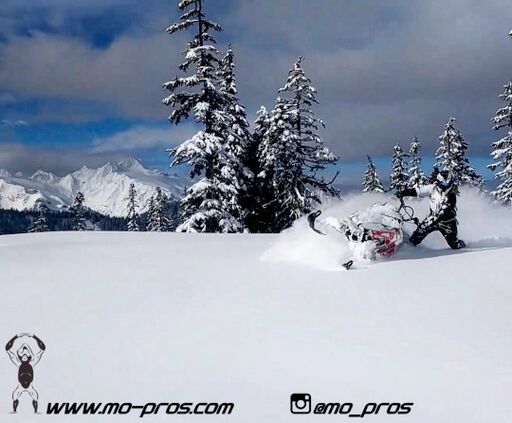
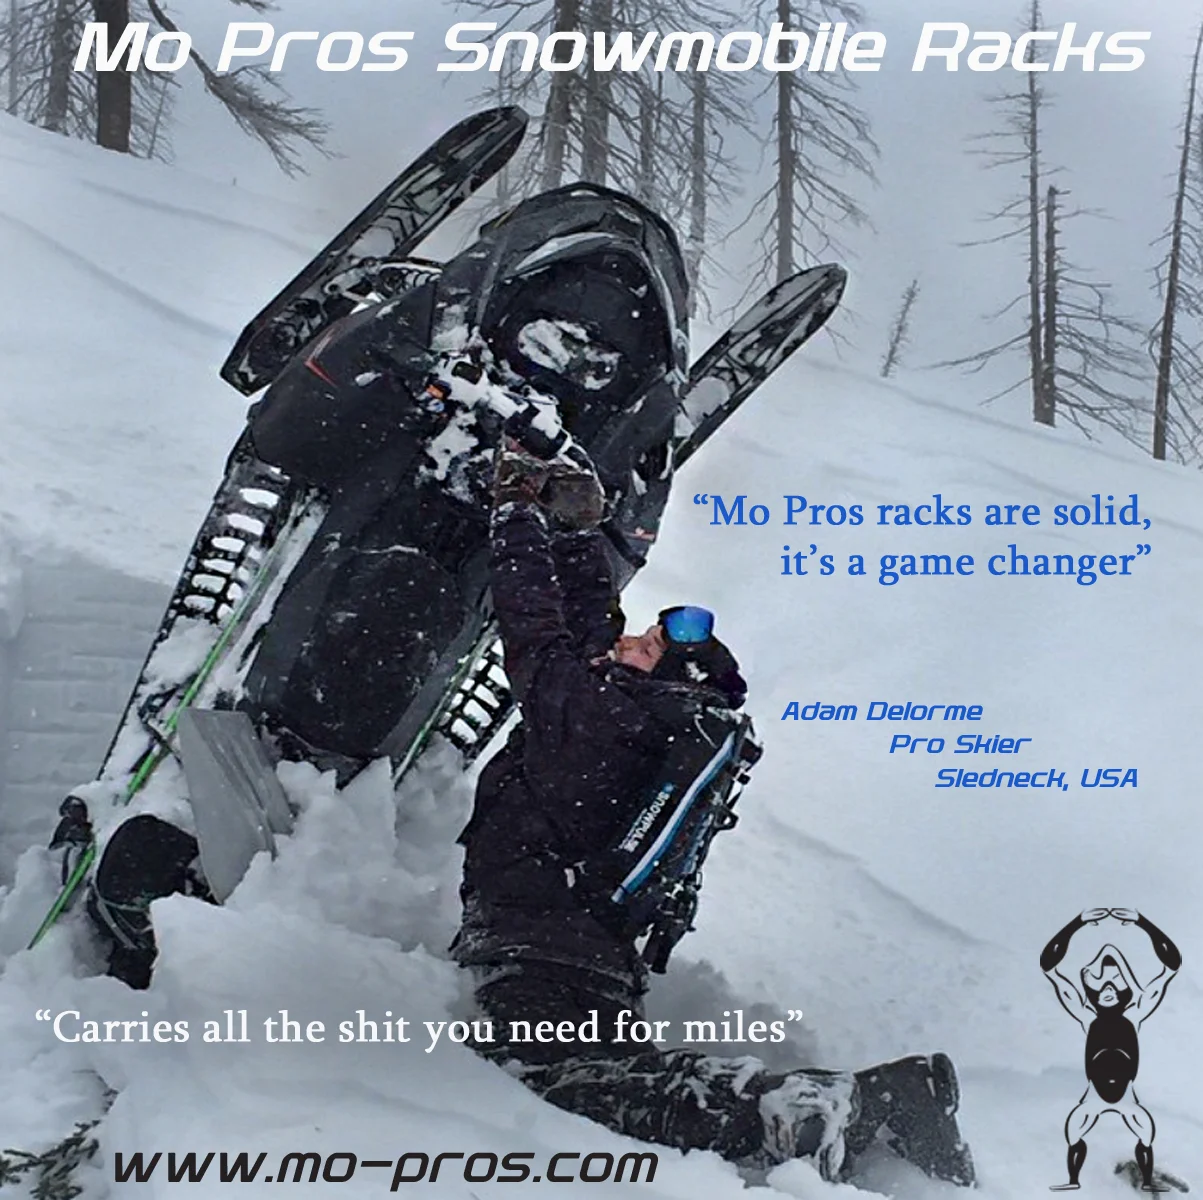
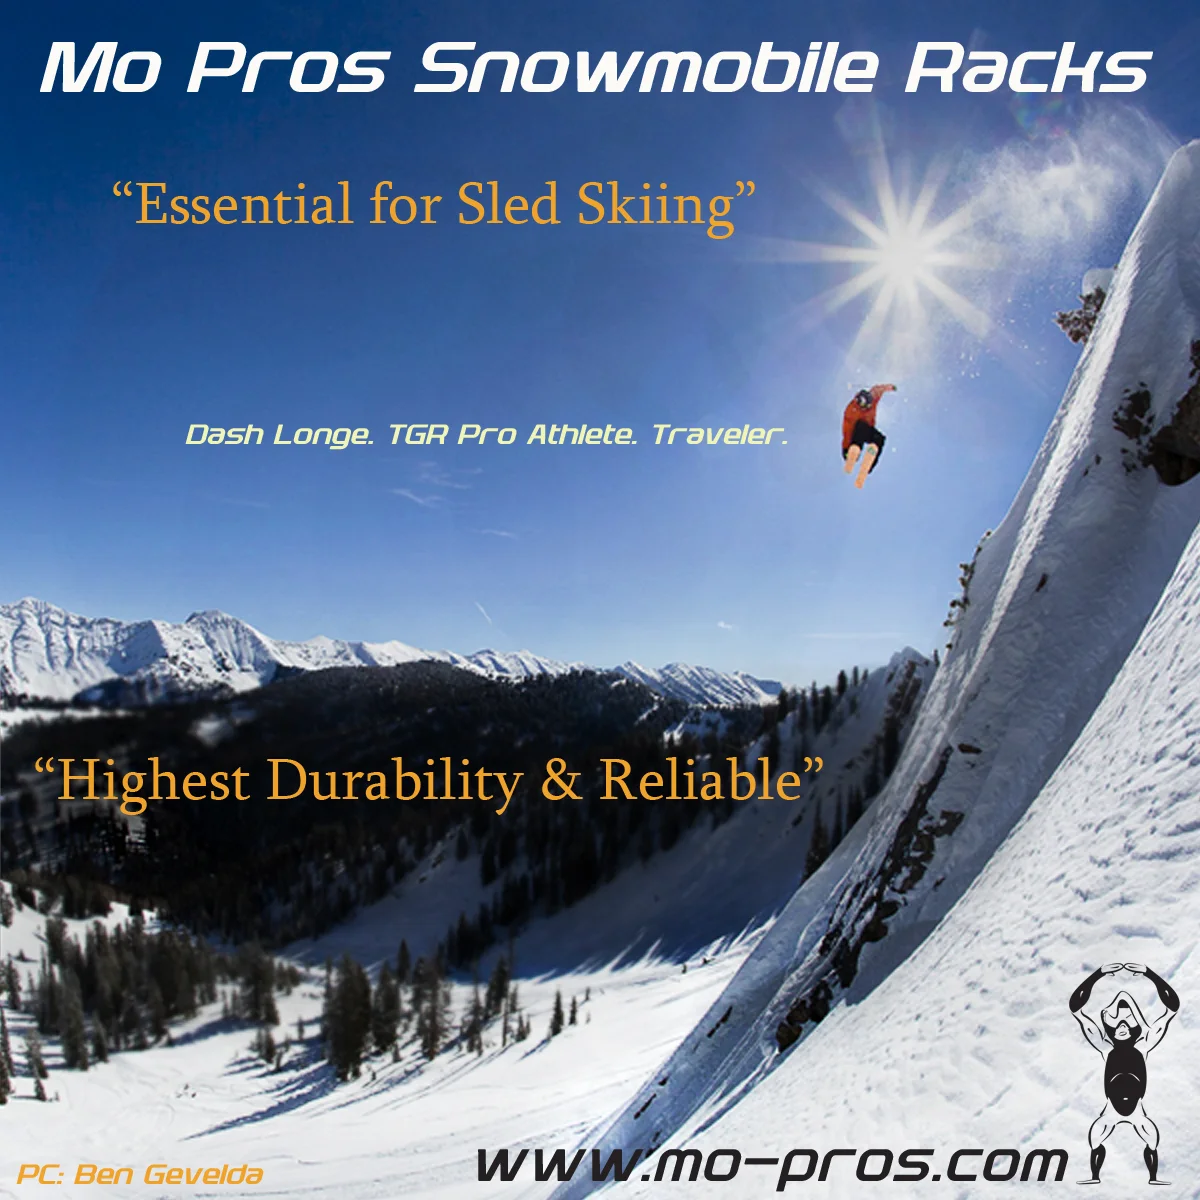
Professional Backcountry Travelers
The Mo Pros Rack system is widely utilized by various industry experts. This expertise ranges from supporting all the Avalanche Centers in the Continental West along with specific professional athletes, and of course professional backcountry travelers like you.
The Mo Pros Rack system is widely utilized by various industry experts. This expertise ranges from supporting all the Avalanche Centers in the Continental West along with specific professional athletes, and of course professional backcountry travelers like you.
The same message rings across all dimensions of users, the Mo Pros Ajoosta Snowmobile Rack System is a proven tool out in the mountains. Not only will this Snowmobile Rack configure to your explicit needs, but it also has more capability to carry external devices; changing into a snowmobile ski rack or snowmobile snowboard rack.
Haul and load whatever you want. Bring firewood to the cabin, chainsaws for early season trail clearing, first aid kits, gas stove for lunches, coolers, tool kits, gas, snowbungees, and much much more. If you want to bring it, you can put it into a Mo Pros Snowmobile Rack, quickly and easily.
It's a proven design of versatility and function, but also serves as a supporting structure to strengthen and add rigidity to the chassis of the snowmobile. An integral part of the Mo Pros Snowmobile Rack system, keeping you from needing to purchase extra tunnel stiffeners and accessories; making sure you never miss money out of your pocket OR miss a day on the snow.


Buying a Sled to Bag More Lines
It’s not secret that a new snowmobile is the ultimate accessory for a skier or snowboarder.
Are thoughts of grandeur about buying a snowmobile and heading out to the backcountry with friends rattling your brain cage?..... we don't blame you.
However, before you get out there and begin the reign of terror amongst any and all snowy regions, check out the article recently published over at Mountain Weekly.

The article speaks to some of the common misconceptions which fall in line with owning a snowmobile, maintaining one, and of course trying to use it.
Just piloting a snowmobile on it's own is tricky, but going skiing or snowboarding with one is quite the different animal.
We found the Mountain Weekly article extremely accurate and also a useful guide for being successful in your efforts with taming the mountain pony.
The article features excellent reasoning about:
- Snowmobile Size Selection
- Risks to Sharing Snowmobiles
- Skipping the Helmet to Save 50 Bucks
- Respecting Skills and Progression
- Equipment Carrying Strategies
At this point, if you're not convinced enough to read the article then that's a 'Faux Pas' in itself.
So get on with it and check out The Five Faux Pas of Sled-Skiing to start making situations like these photos more manageable.
Snowmobile Suspension Set Up & Tuning
Let's just kick this thing off right. If you're having troubles with snowmobiling and thinking you just bought the 'wrong one,' go to a dealer and drop 13k to solve your problems....True or False?

Well hopefully we catch you in time, because the above statement is definitely FALSE. Did you know? The majority of dealers release snowmobiles into the hands of owners (new to snowmobiling or not) without any education or training behind adjusting the suspension set up for appropriate riding. Which means, you're likely riding your snowmobile at the general suspension setting which was applied by the dealer when you bought it.........but this is not a dealer bashing moment, because suspension set up is truly the snowmobile owners responsibility.
By now you might be running through the back log of memories regarding what types of adjustments you have made in the past, if any at all. What we are trying to achieve here is creating awareness of how to set up the snowmobile you own today or tomorrow in order to improve YOUR experience on the snow. We would even stress this entire discussion is more important when buying a snowmobile from a private seller.........
A brief example, if you want to side hill better your suspension has to be able to flex into the hill.....if you're set up too tight, you're working way too hard.
**Note: Any references to rider weight is considered with all gear. This includes fuel cans, back packs, avy gear, ski's/snowboards on board, and anything you're planning to eat for lunch.....
This blog post will address the suspension items you can set up on your sled, it would be advantageous to get your owners manual for reference of stock settings for this exercise. If you do not have your owners manual, search online and get it printed, the majority of manufacturers offer printable versions.
1) Shock Preload
What is preload? How does it work? Why does it matter? Preload is defined as the amount of compression applied to a spring, without being subject to additional applied weight. If the preload is not set right (for the rider weight) then the body of your snowmobile will roll and dive excessively in corners. How do you know you have too much preload? Well the inner ski on a corner will typically raise up......To determine preload, start by getting your sled off the ground and unweighted. A convenient way to accomplish this is by running a ratchet strap off an 8 foot 2x6 which spans a few garage rafters. For this adjustment you can raise one end of the snowmobile at a time.
Coil Over Shock - Loosen the back adjuster off the spring until no pressure is applied, then measure free length of spring. With the free length measured, tension the back adjuster onto the spring, decreasing length of spring by 5 to 10 mm. Apply this to all front and rear shocks.
Nitrogen Gas/Air Shock - Gas shocks rely on oil and nitrogen to change preload, the Mo Pros Tune will be able to assist with the right oil for rider weight. Since you have the machine up in the air already, removing the shocks is easy and a service is about $75 per shock for an oil swap and rider specific tune.
Air Shock - Adjusting the air pressure will congruently adjust the preload and spring rate. Utilize the set up manual provided to determine starting set up psi for tuning.
**Note - Did you know the front shock in the rear suspension system is the most forgotten yet the most important? This shock does the majority of the work in the rear suspension, taking all of the hits from bumps first, and controls weight transfer contributing to bite/traction on acceleration; this is especially true with the newer rider forward snowmobile geometries.
2) Limit Strap & Coupling System
The limit strap is a way to determine where your engines torque is placed along the length of your track and where the track will grab most when applying more throttle. Some sleds provide separate adjustment in this area but otherwise (like a 2011 or newer Polaris Pro) the adjustment is all in the front most shock of the rear track. If the shock is tighter in preload, you would conceptually be shortening the limiter strap.
Place the sled on a hard and even surface. Turn your attention to the start of the track and front part of the rails and verify the limit strap is free of tension. You should be able to move this back and forth with ease and it connects the front part of the rails to the front torque arm. If there is tension on the limiter strap, loosen it into longest position to relieve tension.
Depending on snowmobile type, you could have a coupling system as well. If equipped, set the coupling system adjuster device in an uncoupled position. Also, be sure to check your owner’s manual to find your specific sled’s neutral setting.

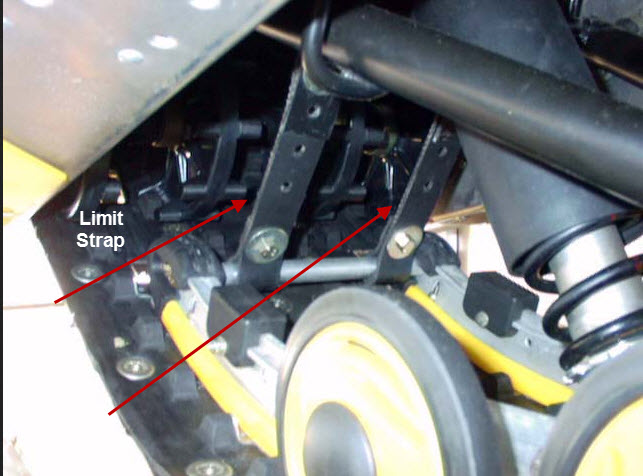
Congratulations! You have successfully set your snowmobile to complete neutrality. A snowmobile will be more successful when you have achieved the appropriate energy transfer and you want this 'balanced'. Wheelies are cool, but if you want to make it to the top your track generally needs to be in contact with the snow..... Let's keep moving.
3) Verifying Even Weight Distribution
Walk a few steps back from the side of the snowmobile, crouch down and site the skid frame rails. Have a close look, ensure they are resting flat by seeing how the paddles in the track make contact to the floor.
3a) Front Rail - Where the skid frame turns flat on the front of the the rail, inspect and verify this is contacting the ground. If it's not, verify your limit strap is entirely free of tension and on the last hole position. Do not remove the limit strap entirely, real bad idea.
3b) Rear Axle - If the rear axle is off the ground, the front shock preload is likely too soft and allowing the front end to sag. Tighten the preload on both front shocks evenly, shifting weight to the rear of the track until it touches the ground. BE SURE you only use the skidrail at the rear axle mount as the reference point. Some snowmobile models have raised rails (Polaris) which move up towards the end of the track. It's good to have a spotter here, allowing front preload adjustment with eyes on the rear skid rail.
4) Front Free Sag
Free sag is defined by: How much the suspension in any vehicle compresses under it's own weight. This means you should not be standing on it or have any tools piled on it either....just saying. The typical target range of free sag is 20% of the total front travel
4a) Measuring the front free sag can be accomplished by using the front bumper as a reference. Start by lifting the snowmobile at the front bumper until the shocks are fully extended (do not lift the skis off the ground) and record the measurement from the floor, then lower back to the floor. This measurement is the total travel height.
4b) Bounce on the front bumper and compress the suspension 3-4 times, then allow the front suspension to return to resting position. Take an additional measurement at the same location of the front bumper and record. This is your Free Sag Measurement
4c) You have now successfully measured your free sag. Increase or decrease front shock spring preload by as needed to achieve the free sag. Utilize the information below to attain appropriate Front Free Sag Height measurement.
Technical Terrain Riding: 1" - 2" Free Sag
Trail Riding/Semi-Technical Riding: 20% Free Sag
20% Free Sag Calculation: (Fully Extended Measurement) / 1.25 = 20% Free Sag
5) Rear Free Sag
Lift up the rear off the ground by the grab bar located on the end of the tunnel. If your sled is already at full extension, you are 'topping out.' Which means your preload is too stiff and needs to be reduced in the rear most shock in the track. Additionally if the rear slams into extension very quickly try reducing preload on front shock in the track, also confirm your torsion bars (skidoo) or shock springs are not set to the stiffest setting.
5b) Gently set the rear down on the ground, cycle the suspension a few times, and allow to rest. Take note the suspension will settle and compress under it's own weight. Friction between the rails and the track make it difficult to get a consistent measurement here, but do your best. The most important thing when checking rear free sag is to make sure you have some sag and are not topping out as mentioned above.
Alright! You have made it this far and ready to get into what is referred to as Race/Loaded Sag. Race/Loaded Sag is defined by: the suspension amount which is displaced by the rider weight (fully geared), luggage, skis/snowboards, cargo, and or additional passengers.
5) Setting Race/Loaded Sag
Load your snowmobile with the typical contents you bring out with you when you go riding and don't forger to gear up yourself too, no sense in skipping steps, we are this far now.
5a) Snowmobile with Coupler Blocks - With the sled weighted, the coupler blocks should not be resting on the rear stops when the snowmobile is loaded with the rider and any other gear. Adjust your torsion spring settings to change where the coupler blocks rests. The torsion spring should be adjusted to the stiffness which results in the coupler block being as close to centered between the stops.
5b) Snowmobile without Coupler Blocks As mentioned earlier, the friction between the skidrails and the track will make it challenging to receive consistent measurement. However, check your manual to ensure the manufacturer has not set specific sag measurements to adhere to. Typically if no measurement is outlined by the manufacturer, the desired sag can be 2 - 2 1/2" with the machine full loaded with all gear and rider. Adjust your springs, torsion springs, or air to achieve this sag level.
**Note: As an example, if you're running the Mo Pros rack set up, you're going to have a bag with pretty much defined weight on the snowmobile......cause it's all about keeping that backpack light to conserve rider energy. You'll wanna load the rack up with what you expect to bring with you, cause this will impact your overall race sag numbers.
**Note: We did not mention much about the front preload and shock settings with all the rear adjustments made in Step 5. With more modern snowmobiles, there is usually very little impact of rider weight with front end adjustments. However, we encourage you to check this measurement and prove the race/loaded sag maintains the 20% value as a double check on work. Also, depending on your ride quality preference, this can change as you actually hit snow, going softer OR firmer. Always ensure you have 3/8" of preload on the spring, that is the minimum allowed amount.
Conclusion:
This set up guide should get your machine started in the right format for your riding needs. From here it's recommended you RIDE the snowmobile and begin paying attention to how it behaves and reacts out on the trail and in deeper snow conditions.
We have included some typical troubleshooting tips for you to further tune your snowmobile based on things you experience while riding. Remember, make one adjustment at a time to track progress and behavior. You're going to have this machine for a while and there's no need to rush set up when you can get it perfect to your needs; pay attention to what the machine is telling you and remain patient.
Further Diagnostics and Snowmobile Suspension Troubleshooting
Problem: Body rolls or dives in corners
Possible solution: Try adding preload to the front springs. If your snowmobile comes with a progressive wound coil spring, there might not be enough initial rate available without affecting ride quality at the mid and bottom of the stroke. Installing a single-rate spring or a more-effective dual-rate setup with adjustable ride height and rate is an effective solution.
Problem: Snowmobile still wheelies and raises skis off ground
Possible solution: This is an indication of too much power transfer to the rear of the snowmobile with a fulcrum type effect. If you have already performed appropriate preload adjustment on the center shock AND set the snowmobile suspension tune for accommodating race/loaded sag (Step 5 in guide), try tightening the limiter strap by one position or adding 1/2 turn of tension to the front track shock.
Problem: Sled tips up in corners, lifting the inside ski
Possible solution: Lower the front ride height to reduce the vehicle’s roll center. A sled with a lower center of gravity will typically outperform a vehicle that sits up high. Most roll or ski tip situations are generally related to excessive spring preload that was added to increase bottoming resistance.
Problem: Heavy steering
Possible solution: Heavy steering can be tricky to solve, and adjustments in the rear suspension often affect the cause. If you are experiencing this on a sled with stock skis and carbides, check the rear torsion spring setting, center shock spring preload, and possibly reduce the amount of coupling action. Make sure center shock spring preload is 5 to 10 mm. Typically, more preload to the center spring causes track spin, rear kick-up and a harsh ride. Remember, when you create load in the rear, the load is transferred to the front. In some cases more torsion spring preload will reduce load to the skis by holding the rider higher in the travel and away from the coupler stops.
Problem: Skis come of the ground when trying to accelerate out of corners
Possible solution: Make sure that your ride height is set correctly and you have good front to rear balance. In many cases we have found that increasing the rate of coupling or increasing rear track shock preload (which reduces weight transfer) transmits more load to the skis. Always make spring preload adjustments by 1/2 turn each time.
Problem: Front end raises up easily and then drops with little effort
Possible solution: One of the most common causes of excessive rear sag is a geometry-related issue such as the front torque arm limit strap is pulled in or the vehicle isn’t resting on a flat surface. It’s rare for a snowmobile to sag from weak torsion springs or shock springs. One of the most common misunderstandings is the shock has failed, causing excessive sag. The reality is a shock with a fresh charge may help a little bit, but it’s insignificant. Instead, check ride-height settings.
Source Articles:
See What We See........
If I can attain the riding ability these ladies had in 2008, then I can finally chalk up a 'Win' for snowboarding and make the transition on to sailing.
There's been a lot of chatter in recent months around the Pretty Faces movie.....and so it should be. Looking at it from behind the scenes: kick starter campaign, sponsors, budgets, coordinating around the weather, late night Skyping......the girls bashed through the road blocks, executed, and the end product was fabulous. Prost!
We attended the film in our home town of Bellingham and managed to squeeze a seat amongst the skittles festival of Patagonia puffy jackets. Let me tell you, witnessing repetitive line crushing requires a comfortable chair; especially when a freight train of thought rails through your mind 'These gals are crushing it, and I respect that, but I have seen ladies shred hard like this before, but it just wasn't skiing....."
What sparked this thought while watching an obviously bad ass film? The 'Pretty Faces' movie makes definitive references and reflections on the drivers which empowered them to excel as athletes. Much of this empowerment being the byproduct of seeing other females athletes push the limit over the years in various mediums like movies, magazines, and even personal chair lift time.
Speaking of the past, let's take a step back in snowboard film memory lane. For reference, we'll mark the time period with the release of 'That's it That's All.' The Travis Rice feature video project with Curt Morgan in 2008, need a refresher or not with us yet? Well a bunch of guys got together and basically raised the bar in snowboarding cinematic standards, shot fire works at one another, and built these massive kickers to reach tree tops. I would be lying if I did not disclose I still watch it once a year........the madness is simply brilliant.
Web Page Link: http://www.thatsit-thatsall.com/
So it's 2008, Travis and his friends are jet setting across the planet having a grand ol' time,......because there wasn't ANY 'Pretty Faces,' back then it was only Redbull and helicopters; That's It...... That's All.'
Same year, just cut through all the hype (not that is wasn't warranted) and you'll find a different crew composed of some RAD women with snowboards, snowmobiles, and original gangster motivation. These girls got together and delivered a very impressive project, throwing huge tricks, nailing some major lines and actually all continue to throw it even harder today.......together.
The movie project was called 'See What I See' and produced by Runway Films. We have not been able to locate much information on this movie but get your hands on it if you can. The riding is primarily supported with back country sled access for terrain, there's also some dry Japan POW, a spring slush resort session, and a little mix of street; but it's all fantastic riding. If I can attain the riding ability these ladies had in 2008, then I can finally chalk up a 'Win' for snowboarding and make the transition on to sailing.
Youtube Teaser: http://www.youtube.com/watch?v=SGpM1yv7Bic
4 copies Left: http://www.amazon.com/Runway-Films-See-What-Snowboard/dp/B001N0MXCY
Runway Films 'La La Land' : http://vimeo.com/m/75376499
The 'Pretty Faces' movie speaks to the bonding relationships created within the industry, personal or professional. We recognize the strength of that message and could not think of a better example which exemplifies it than 'See What I See.' With continued efforts to highlight the development of women's athletics, we hope this newly rattled energy provides awareness to past projects and further inspires what can be accomplished through dedication.

Riders: Natasza Zurek, Anne Flore Marxer, Desiree Melancon, Erin Comstock, Cheryl Maas, Gretchen Bleiler, Kimmy Fasani, Raewyn R, Meghann O’Brien, Leanne Pelosi, Kjersti Buaas, Robin Van Gynn, Jamie Anderson, Izumi Amaike, Janna Meyen, Jacqui Berg, Marie France Roy, Victoria Jealouse, Coleen Quigley, Chanelle Sladics, Hana Beaman, and friends.
Roadside Assistance
Change your season from standard resort days and latte's to overnights, parking lots, and exploring.
Every season people always say "I don't want to buy a Season Pass this year......I just want to travel." Man, I don't know, sounds pretty sweet! Now fast forward to March and ask yourself if the above every really happened.....
With traveling comes logistics, if it's not where the snow is, it's: where to stay, how to get there, when to leave, what to pack, how much it is going to cost, and who's coming with me. If you really want to make it a fun time, throw a trailer in there and a few snowmobiles; now successfully elevated the level of complexity and probability for carnage.
Traveling with your equipment doesn't come easy and time is of the essence because the majority of people have commitments (non flexible job schedule) to which they must attend. Side note, NEVER grow up.....it's just a trap. Efficiency is top priority, get where you need to go in the least amount of time with a well developed plan when you get there.
Noticing the challenges of traveling to new areas, we are happy to announce the release of the Tiny Mo Pros Weather Page. Our goal is to make traveling with you and your friends a little less cumbersome by identifying several key ingredients to promote success and deliver them within a single sourced format. All the information is based on region and includes:

- Radar and Forecasts
- Road Conditions
- Road Cams
- Mountain Pass Information
- Avalanche Centers
- Dedicated Snowmobile Areas
- Printable Snowmobile Trail Maps
- Back Up Resort Options
We encourage you to leverage the Weather Page for assisting in planning your future trips or even when you're physically on the road. With our single source information you can tackle the majority of the research using a cell phone from the road, keeping you mobile and chasing storms.
Change your season from: Standard resort days and afternoon latte's into overnights in parking lots and exploring, .
Rally your friends, check the Weather Page, Get Mobile.
Transworld Snowboarding 2014/2015 Gear Guide
Transworld Snowboarding has completely redesigned the Gear Guide in 2014/2015, focusing more on key innovations within products to assist in consumer purchasing decisions.
We are pleased to share the Ajoosta Sled Module has been selected by Transworld Magazine as an essential 'Backcountry Expedition Ready Accessory' for the 2014/2015 season.
"Our goal is to help readers make the best purchasing decisions by highlighting standout features and their benefits. There’s a lot of gear out there and it’s our job to help you sift through it"
We extend great appreciation to the Transworld Snowboarding team and editors. Thank you for noticing the functionality and benefits to utilizing the Ajoosta Sled Module system, along with sharing our hard work within your direct community.
Editors:
- Ben Gavelda
- Nick Hamilton
- Brady Ferdig
